What is the Account Management Screen?
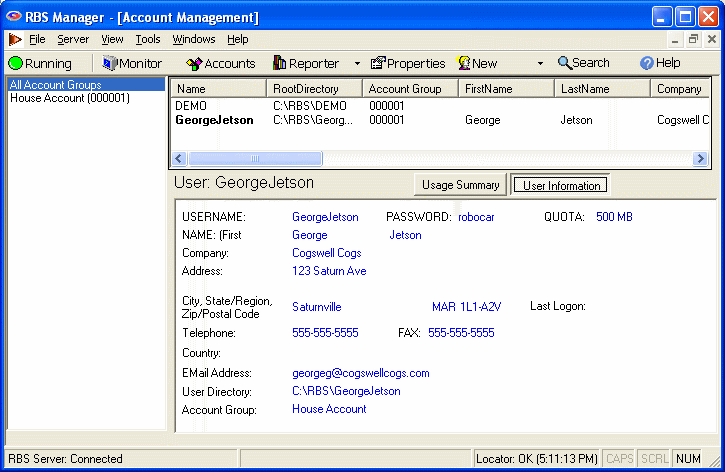
The Account Management screen is where you manage your clients' accounts. You can add users, delete users, modify their service options, and view statistics.

This is also where you maintain Reseller Accounts for your agents and dealers. Do not confuse Reseller Accounts with Users. Reseller Accounts are assigned to your agents and dealers who resell your service, including the "House Account" which is yourself. Users are the people who use your Remote Backup service.
You may want to use agents or salesmen to sell your Remote Backup Service, and you may want to pay them on a commission basis. So, you will want a way to find out which RBS customers belong to which agent or salesman. RBackup gives you a way to assign RBS customers to agents using Multiple Accounts.
If you do not use Agents or Dealers, or if you are not offering Remote Backup to the public, assign Users to the House Account (000001).
RBS Accounts provide a method to track the source of RBS Clients. Accounts can be applied on different levels.
If the provider sells end user backup services and does not use agents, EVERYBODY is on Account 1 - the House Account - and no further customization is necessary.
If you offer backup services through agents or dealers, Accounts are used to create the master installation CD separately for each agent / dealer. When the CD's are distributed by the dealer or agent, and the client registers, the client software identifies its originating dealer to the server.
The most common way to separate Client installations is to create a Client installation set for each agent. Your RBS Server maintains a folder that contains a complete Client installation ready to copy to CDs and distribute. It is usually called C:\Program Files\RBS Server\Client
Configuring your Remote Backup Service to handle multiple accounts is easy if you follow a few simple rules. This section discusses several ways to setup for and maintain an installation using multiple accounts.
You can create and manage accounts using the Accounts screen. To get here, click the Accounts button.

The Accounts screen allows you to configure the name of your company and of your Agents. Your own account is always the House Account. Other accounts are optional.

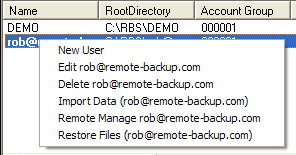
You can edit a Reseller Account by highlighting it and right-clicking. You can also add, delete, import data, remotely manage accounts, and restore client files from here.

Enter or edit the information for this user's account. Press Save to save the data.
The login name of this user. This field is case-sensitive and cannot be changed after it is entered for the first time. Do not use spaces, slash characters, or punctuation marks.
PASSWORD
This is the word or phrase used to authenticate this user when the Client software connects with the server. It is case-sensitive. Note that this is NOT the user's Encryption Key. This is the password that this user will use to access his account on your Server. See "Selecting Your Password" for guidelines on picking a proper password.
Account: (Group) - The Account Group (or Reseller Account) that this user is assigned to. If you don't use resellers, assign all users to House Account (000001)
QUOTA - The maximum disk space this user is allowed to use for storing his data on the RBS Server. Quota is expressed in compressed file size. This is the actual storage space used by each user. After the quota is reached the user will show up on the Quota Report, and will continue to be allowed to do backups. The Email Notification PlugIn can optionally report the total storage space used and the percentage of quota used by each client.
Root Directory - This is the root directory for this client's data. The RBS Server creates and maintains directories for each user. The root directory for each user is automatically given a name identical to the USERNAME above. In normal use, accept the default entry, which will be entered automatically for you.
Open Location - This button opens the Root Directory in a Windows browser window.
Account Type - Select the Client Edition for this customer. The Client's software will adjust itself on the next contact with the Server.
Enable Hard Quota - If checkmarked, the normal "soft quota" will be overridden by a hard quota. This will halt backups from this client when he hits his quota.
Contact Information - This user's name, address, and other information
Trial Acct - Check this box if this is a Trial Account. Trial accounts operate the same as regular accounts, except that they are automatically suspended after the number of days you can specify.
Days - (displays only if Trial Acct is selected) Specify the number of days for this Trial Account.
Suspend - When this checkbox is selected the user will not be able to log in.
Manage - Pick this button to Remotely Manage this client. You can change some features of the Client even after it has been deployed, without visiting the client site. For more information, see the section on Remote Client Management.
Save - Pick this button to save this Client's information.
Cancel - Pick this button to cancel without saving.
Delete - Pick this button to delete this user. You will be asked if you want to also delete all his data.
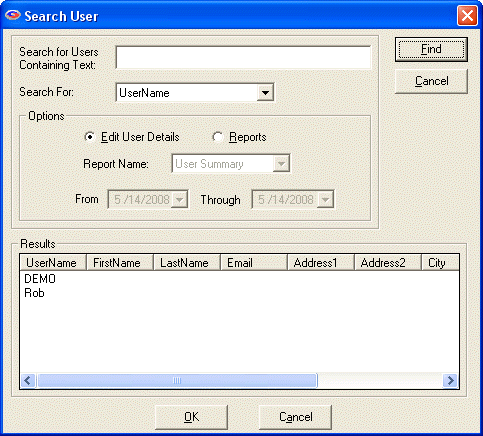
The Search Users Screen
 When you have more clients than it is reasonable to find by scrolling through them, you can use the Search Users function on the Tools menu.
Here you can enter all or part of a user's name or other piece of his record, and the Search function will quickly find all matching records for you to select from. You can perform a search to Edit user details, or to run reports.
When you have highlighted the user you want, select the OK button to continue to the Edit or Report screen.