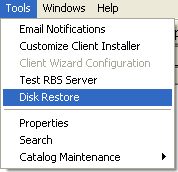
 Introduction to Disk Restore
The Disk Restore function is used to restore Client data at the Server. This is useful if you have a client who needs a massive amount of data restored quickly, and doesn't have time to do an online restore.
This function will restore data to a removable hard drive, a DVD, a CD, a memory stick, or any mapped drive, which can then be returned to the Client and simply copied.
In order to use the Disk Restore function, you must know the Client's Encryption Method and Encryption Key, or his Key File. It is important to note that because of RBackup's high security, it is impossible to restore Client data at the Server without these either the Key File or these two pieces of information.
Note: Some files cannot be restored at the RBS Server for technical or network reasons. These include SystemState, Active Directory, Exchange, Oracle, Sharepoint, and SQL Server.
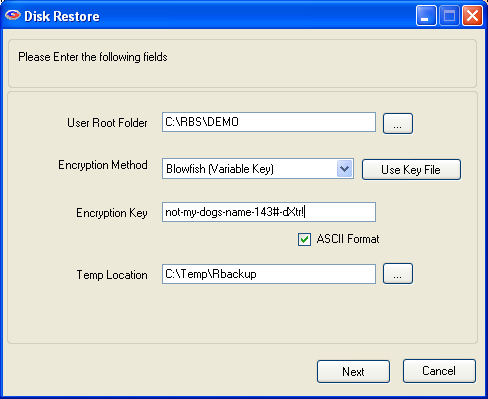 User Root Folder
The user's data folder on the RBS Server. This is usually a folder with the user's login name under the default data folder.
Select the user's Encryption Method from the dropdown menu, or use the Key File.
The RBackup Client software maintains a Key File which contains the Client's Encryption Method and Encryption Key. This file resides on the Client computer, and it may have also been copied to a removable drive. When the Client changes his Encryption Key, RBackup asks if he wants to make a new Key File.
If the Client answers "No" to RBackup's prompt, his Key File will not be updated, and cannot be used to restore data.
Enter the Client's Encryption Key. The key can be entered either in ASCII (Printable and Readable) format, or it can be entered in HEX format. The default is ASCII. To change to HEX, uncheck the ASCII Format checkbox.
The Disk Restore function needs some work space to decompress, decrypt, and patch backup files before copying them to the target drive. If your C: drive is low on disk space, you can change this location to anywhere else. This is NOT the location where you want to copy the Client's files!
Press the Next button. Note: If the Client folder contains many files, there might be a long pause while the Server collects the information it needs to display the next screen.
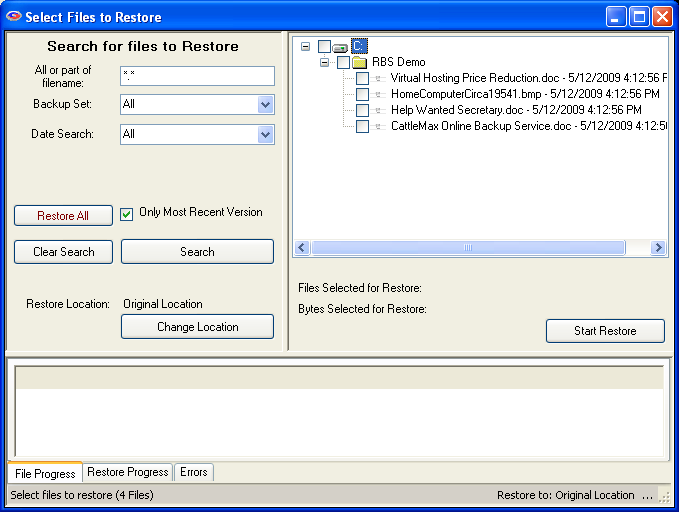
This is the main Restore screen, which allows you to search for files to restore. The left pane contains the file selection criteria. The right pane contains the files you have found in the search. Select files to restore in the right pane. The bottom pane shows the progress and results of your restore operation.
 All or part of filename
Enter any part of the file name or folder name to search for files, or leave this as *.* to search through all files.
Hint: To display ALL files that have been backed up, UNcheck "Only Most Recent Version" and use the defaults for all other fields. Press the "Search" button to display the files.
 Backup Set
Select which backup set to search though, or select All backup sets.
Date Search: Select OnDate, BeforeDate, AfterDate, BetweenDates, or All.
On Date: Selects files backed up on a date.
Before Date: Selects files backed up before a date.
After Date: Selects files backed up after a date.
Between Dates: Selects files backed up between two dates.
Select the date from a drop-down calendar to use in the search. If you select Between Dates, there will be two Date fields. Note: The calendars will only let you select dates for files that have been backed up.
When you have entered your search criteria, press the Search button. The files found in your search will appear in the right pane. You may now enter other search criteria to find more files, which will be added to the right pane.
To clear your search and start over again, press the Clear Search button.
After you have searched for files, and have selected the ones you want to restore by checkmarking them in the right pane, press the Start Restore button to begin the restoration.
Don't forget to change the Restore Location to avoid accidentally over-writing files on your RBS Server!
Restore Location and the Change Location Button - In the left pane, near the bottom, the current Restore Location is listed. The default is Original Locationso the restored files will be placed in the same drive letter and path on your Server from which they were backed up on the Client. This is rarely advisable. To restore to a different location, select the Change Location button to select another location, such as your removable drive.
Remote Backup will create the original folder structure at the new location and restore the files there.

This screen displays if you have selected to restore files to their original location (which is the default) and asks if you want to redirect the restored files to another location. Normally, answer YES, and the software will allow you to select a location for the restored files.

During the restore process you will see this progress screen in the bottom pane.
While this Restore screen is exactly the same as the Restore interface on the Client software, and these special files can be restored there, they cannot be restored at the RBS Server because they require an existing, functional Database Server, or some other external engine that exists only on the Client computer. These data objects will not appear on the Server's Disk Restore screen if they cannot be restored at the RBS Server.