Client Administrator's Override
This section refers to special options that appear on the Client's screen - not the Server. These features are not documented in the Client's documentation.
 When you entered the Administrator's Password in the Customize Client Installer screens, you activated the Remote Backup Client Administrator's Override feature. This feature is activated double-clicking on a small padlock icon in the RBackup Client.
The Client Administrator's Override Featureis not documented in the Client's User's Manual for security reasons.
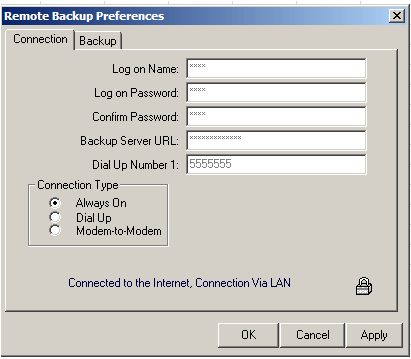
To access the Remote Backup Client Administrator's Override, select Options:Preferences then select the Connection tab. Double-click on the padlock.
Enter the Override Password you entered in the Customize Client Installer screens.
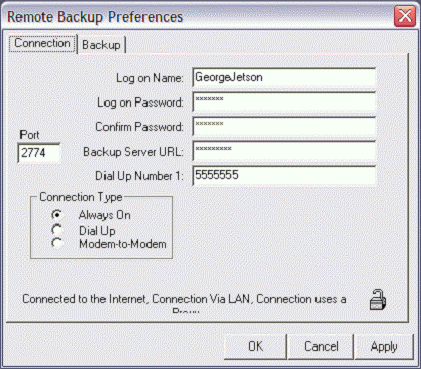 You will notice that the screen has changed. You will see an entry field called Port with the Command Port number that the Client uses to communicate with the Server. It should be the same as the Command Port number selected at the Server. It is usually 2774.
You can also change the Log on Name and Password for this user.
Place the cursor over the text, Backup Server URL: and hit the left mouse button.
The text changes to read Authentication You can override the current Account Authentication code.
Place the cursor over the text, Authentication and hit the left mouse button.
The text changes to read RBS Server URL: You can enter your RBS Server's IP address.
Again, place the cursor over the text RBS Server URL: and press the left mouse button.
The text will change to RBS Login ID. You can enter your RBS Server's Login ID.
Place the cursor over the text RBSLogin ID and press the left mouse button.
The text now changes to RBS Password. You can enter the RBS Server's Password.
Place the cursor over the text RBSPassword and press the left mouse button.
The text now changes to DUN Entry Name You can enter the RBS Server's DUN name.
Place the cursor over the text DUN Entry Name and press the left mouse button.
The text now changes to Admin Password You can enter a new Admin password.
Place the cursor over the text Dial Up #1 and press the left mouse button.
The text now changes to Dial Up #2 You can enter a dial-up #2 phone number.
As you click on these text labels they will cycle through again and again. You can change any of the values in the entry fields. When finished, click the Apply button. The following window will display.
After you do this, the Client software will remain in Admin mode, displaying features and info that you may not want your Client to have access to. To close Admin mode, go back to the Options:Preferences:Connection tab and double-click the padlock icon to close it.
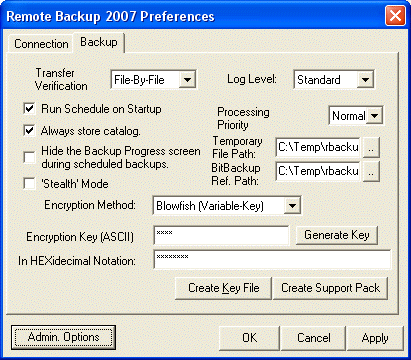 Backup Tab This tab contains settings that effect the basic operation of RBackup.
Transfer Verification The selection At-End tells the Client software to compress and encrypt all files, then send them all at one time to the RBS Server, verifying them all at once, at the end of the transfer. This verification method is good when you want to limit the time the Client spends on the Internet or telephone line. It requires more client disk space, and it transfers data faster.
The selection File-By-File tells the Client software to transfer files as it compresses and encrypts them. This method requires much less drive space. This method verifies files one at a time.
Log Level
This selection is for fine-tuning RBackup with Remote Backup Systems' Tech Support staff. Use it only at the recommendation of RBS.
Run Schedule on Startup
Select this option to have the Client start automatically with Windows.
Always Store Catalog
Select this option to have RBackup back up the Client's catalog to the RBS Server even if there are no files to back up.
Hide the Backup Progress Screen
Select this option to hide the screen that displays progress during backups. This is good if you want the Client to do backups without interrupting his other programs with a display screen.
Stealth Mode
Select this option to have the Client run with no screens at all, including no startup screens.
Processing Priority
This selects the priority given to backup tasks by the CPU. A lower priority slows down processing, but gives higher priority to the other tasks running on the Client computer.
Temporary File Path
This is the location on the Client's hard drive where temporary files are stored during backup processing.
BitBackup Ref Path
The location of the BitBackup Reference Files. BitBackup stores a copy of all the files selected for backup using the BitBackup method (on the Schedule Screen). The space required for this storage space is the total native file size of all files for which BitBackup has been selected.
Encryption Method
RBackup lets you pick from a variety of encryption standards that range from "normal" encryption to ultra-strong encryption. For more on encryption, see the section on Encryption Standards.
File Encryption Key
The Encryption Key is important in securing data backed up by the Client. It is the key to being able to unlock and read backed up data. See the section on Encryption Keys for more information.
Confirm Encryption Key
Enter your Encryption Key twice, to make sure you have it right.
Generate Key
It is strongly suggested that for maximum security RBackup is allowed to select a proper encryption key for the encryption standard you have chosen. See the section on Encryption Keys for more information.
Create Key File
The RBackup Client can export two files that contain everything needed to restore the Client software to its current condition after a catastrophic computer failure. The Key Files contains the Client's logon information for the RBS Server, as well as his latest Encryption Key. It is highly recommended a customers export Key Files during initial installation, and copy them to a diskette or network drive for safekeeping.
Create SupportPack
This button is intended for use only at the request of Remote Backup Systems' support staff. It creates a set of files that can be Emailed to RBS to assist in diagnosing problems with the Client.
The Admin Options Button displays more administrative options.
You can lock out certain features of the Client software, preventing end users from using them. For example, if you don't want clients to be able to change backup schedules or change file selections, select Lock Scheduler Window and Lock Ability to Change/Add File Selection.
Client Locks are useful when you want to distribute a pre set-up version of the Client software with few options. This allows you to better control your costs and reduce support issues associated with users who might misconfigure the software.
The Advanced Options Tab contains advanced options usually not changed except as suggested by an RBS technician.
QueueLimit - The number of files that will be processed before the next phase of the backup session is started. In this example, RBackup will process 250 files before beginning to upload them to the RBS Server.
SubfolderLimit - The maximum number of files that will be stored in a single subfolder on the RBS Server. Sometimes it is desirable to set this option to 5000 or lower if backups are going slowly because of low resources on the RBS Server.
Timeout - the number of seconds the RBS Client software will wait for a connection to the RBS Server during a temporary loss of the Internet during a backup session. When this value is exceeded, RBackup will close the connection and retry.
StoreName Chars - The number of characters from the original (native) file name that RBackup will append to the Archive file name and store on the RBS Server. For security reasons, the normal setting for this is 0 (zero), which means that none of the original file name is visible. RBS Archive files then have names like this:
200705031388.558635430000000060560000000267.001
However, if you need to display the original file name for data management purposes, you can set this option to display the file name, as in this example where StoreName Chars is set to 21:
Budgetary_Spreadsheet200705031388.558635430000000060560000000267.001
ShowSchedule - Set this option to True to display upcoming backup schedules in a small window near the System Tray. Set it to False if you do not want to see the schedule.
RetainLogs - This option determines how long session logs are retained. If it is set to 7 days, session logs will be erased when they are more than 7 days old.
Exclude TempFiles - This option causes RBackup to skip Temporary Files that end in .TMP. Unless instructed by an RBS Technician, set this to True.
BitBackup Folder Limit - This is the maximum number of files that RBackup will maintain in a single folder in its Data Store. If BitBackups are going too slowly, consider reducing this number. Normally, 10,000 is the largest number of files you should select, and 5,000 is about normal.
BitBackup MaxMemoryUsage - Give BitBackup as much memory as possible. 16 is average. Lower the number in the rare case that the computer displays "Not enough Memory" messages during BitBackups.
BitBackup - SpeedLevel - This option specifies the speed at which BitBackup creates its patch files. The higher the speed, the more CPU time BitBackup requires. The default is 4.
Log Folder - Defines where the server's log files are written. Default is the C:\Program Files\RBS Server folder, but you may place them anywhere on your system. The RBS Server must be stopped to be able to change this setting.
Max FileSize Limit
You can define a maximum file size to be backed up. Files bigger than this will be skipped. The default is Unlimited.
This tab is used to set default Exclusions for the selected backup set. Default Exclusions are files and folders that cannot be selected for backup, and do not appear in the file view. Files and folders are excluded based on wildcards and Virtual Folders, and are customizable by backup set.
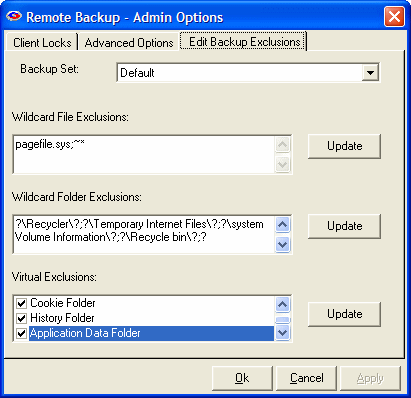
Wildcard File Exclusions
Use this option to exclude files using Wildcards. Separate exclusions with semicolon (;).
File and folder names are not case-sensitive. Click on Edit to add wildcards. To save, click on Update.
Note: Files that match these wildcards will NOT be displayed on the client interface.
This feature accepts the following formats:
Files starting with: (Format: starting {chars} of the filename followed by *)
Examples:
~* This will exclude all files whose filename starts with tilde (~).
Temp* This will exclude all files whose filename starts with ‘Temp’.
Files ending with: (Format: * followed by ending {chars} of the filename)
Example:
*temp This will exclude all files whose filename ends with ‘temp’
By file extension: (Format: * followed by a period (.), then the file extension)
Example:
*.sys This will exclude all files with .sys extension.
By Wildcards: (Format: * followed by {chars} to match, and then ending with a *)
Example:
*tmp* This will exclude all files whose filename has the string ‘tmp’
Wildcard Folder Exclusions
Use this option to exclude folders using Wildcards. Separate exclusions with semicolon (;). Not case-sensitive. Click on Edit to add wildcards. To save, click on Update.
Note: Folders that match these wildcards will NOT be displayed on the client interface.
This feature accepts the following formats:
Folders that exactly match with: (Format: ? followed by ‘foldername’ followed by ?)
Example:
?Windows? This will exclude files where the folder name matches ‘Windows’ anywhere in the entire file path.
Folder name starts with: (Format: ? followed by starting chars of folder name followed by *?)
Example:
?Sys*? This will exclude files where the folder name starts with “sys”
Folder name ends with (Format: ? followed by * followed by ending chars of folder name followed by ?)
Example:
?*32? This will exclude files where the folder name ends with “32”
Folder name LIKE: (Format: ? followed by * followed by chars to match followed by * followed by ?)
Example:
?*temp*? This will exclude files where the folder name is LIKE “temp” anywhere in the file path.
Virtual Exclusions
Use this section to select standard Windows virtual folders for exclusion. Virtual Folders are folders that might not have the same name from computer to computer, but are defined by these virtual names.
Select the following virtual folders to exclude from backup:
Note: Virtual folders marked for exclusion will NOT be displayed on client interface.
Windows Folder
C:\Windows or C:\Winnt
Temporary Folder
System Temp folder. Example: C:\Documents and Settings\Administrator\Local Settings\Temp
Internet Cache Folder
Temporary Internet Files: C:\Documents and Settings\Administrator\Local Settings\Temporary Internet Files
System Folder
Windows System folder. Example: C:\Windows\system32
Cookies Folder
Cookies folder. Example: C:\Documents and Settings\Administrator\Cookies
History Folder
Example: C:\Documents and Settings\Administrator\Local Settings\History
Application Data Folder
Example: C:\Documents and Settings\Administrator\Local Settings\Application Data
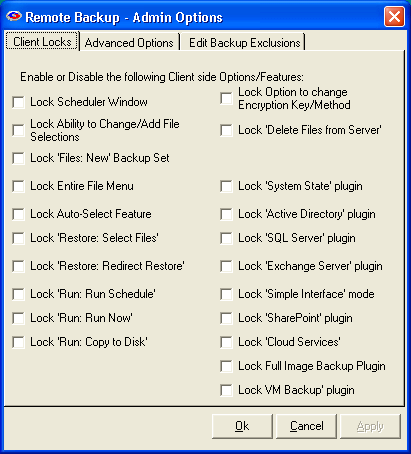 Admin Options Button
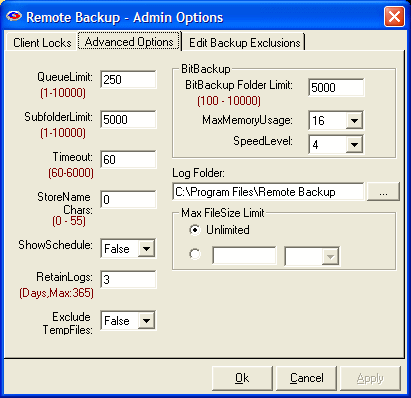 Advanced Options Tab