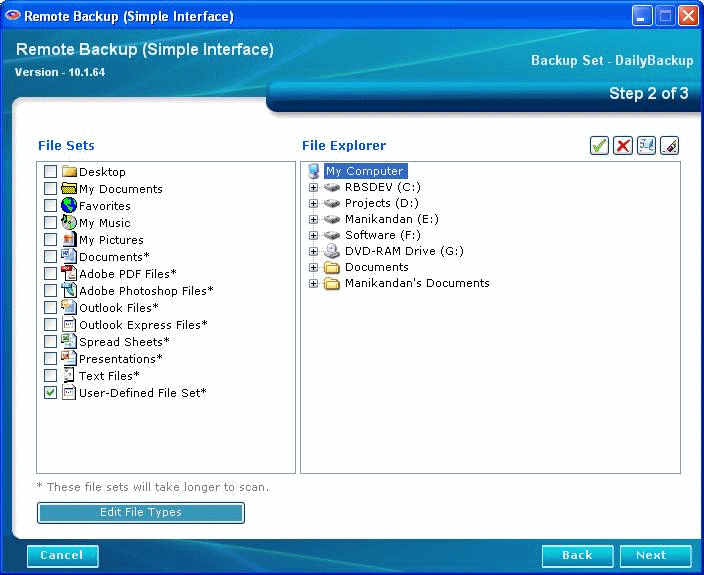
Use this screen to select files for backup.
You can use all three file selection methods. Do this by first selecting files by File Set and/or File Type, and then pruning your file selections using the File Explorer.
File Sets are predefined groups of files. They could be your Favorites, or your My Documents, or Spreadsheets. File Sets are listed in the left pane of the File Selection window. To select File Sets for backup, place a checkmark in the box next to the file set name. As you select file sets, you will see checkmarks appear over the corresponding files and folders in the File Explorer in the right pane.
File sets with an asterisk beside them search the entire hard drive for files, and so they take longer to execute during a backup. Selecting one of these file sets turns on the Edit File Types button. Click it to edit.
 You can select individual files and folders using the File Explorer in the right pane. To select a file or folder for backup, click it to highlight it and then pick one of the File Selection Buttons in the upper right of the screen.
 To select a file or folder for backup, place a green checkmark over it. You can do this by highlighting the file or folder, and then selecting one of the File Selection buttons in the upper right of the screen. OR you can right-click on an item and select Include, Exclude, or Clear from the pull-down menu.
 To exclude a file or folder from the backup, place a red X over it by selecting the Exclude button, or Exclude from the right-click menu.
 To clear all file selection marks, select the Clear button, or Clear from the right-click menu.
You can clear all file selections by selecting the Clear All button.
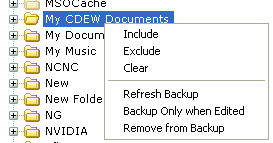 The Right-Click File Selection Menu contains choices used to select and exclude files from backup.
Include - Include in the backup
Exclude - Exclude from the backup
Clear - Clear File Selection marks.
Files are usually backed up if they have been edited or changed since their last backup. (This behavior can be changed in the Schedule Screen, but for purposes of this section of the documentation, assume that's the way it is set.) If you want to back up a file or folder, even though it has not changed since its last backup, you can select Refresh Backup and it will be backed up with the next session.
The opposite of Refresh Backup, this option tells the software to drop the selected item from the next backup even though it has been changed or edited since the last backup.
This option tells the software to remove the selected item from the Backup Set. The file or folder will not be backed up, and all File Selection marks will be removed.
Your computer contains many types of files, usually defined by which applications they belong to, and characterized by file extension (the part of the file name to the right of the period.) For example, your computer defines a file that ends in ".DOC" as a Microsoft Word Document. These are called "System File Types" because your computer system knows what kinds of files they are.
This tab lists all the file types recognized by your computer system. You can select file types for backup and for exclusion from backup.

To include a file type, place a green checkmark over your choice. To exclude a file type, place a red X. You can select multiple choices using the regular Windows selection keys - Shift/Click and Control/Click. As with other file selection methods, you can also use the right-click menu.
Your computer system knows about most file types, but not all of them. Some file types may have been added by your Service Provider for special use. These are listed in the User Defined File Type Tab. Here you can add, edit, and delete your own file types.
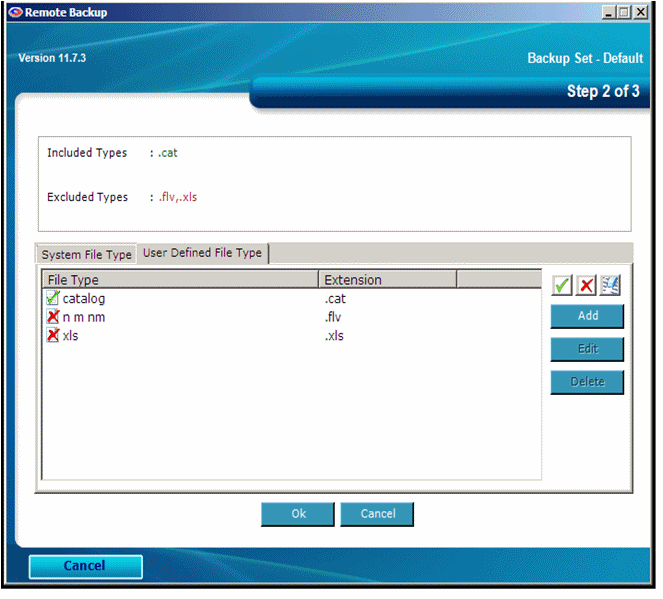
To include a file type, place a green checkmark over your choice. To exclude a file type, place a red X. You can select multiple choices using the regular Windows selection keys - Shift/Click and Control/Click. As with other file selection methods, you can also use the right-click menu.
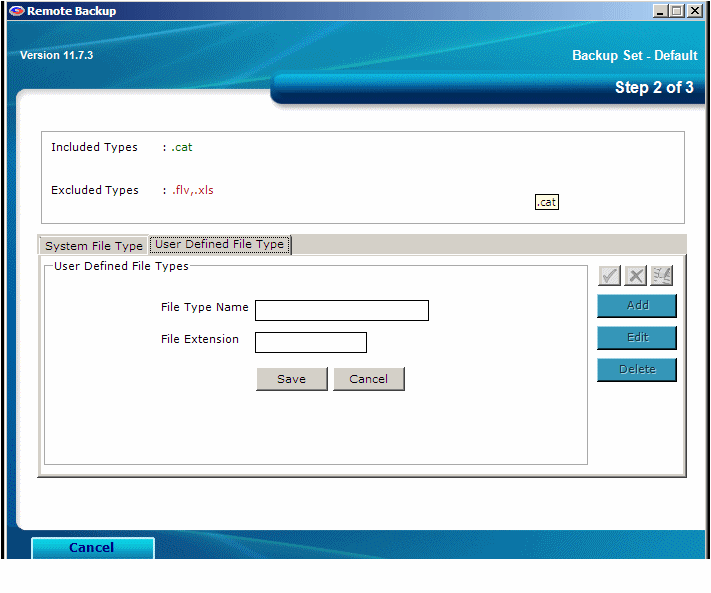
To add a new User Defined File Type, Select the Add button
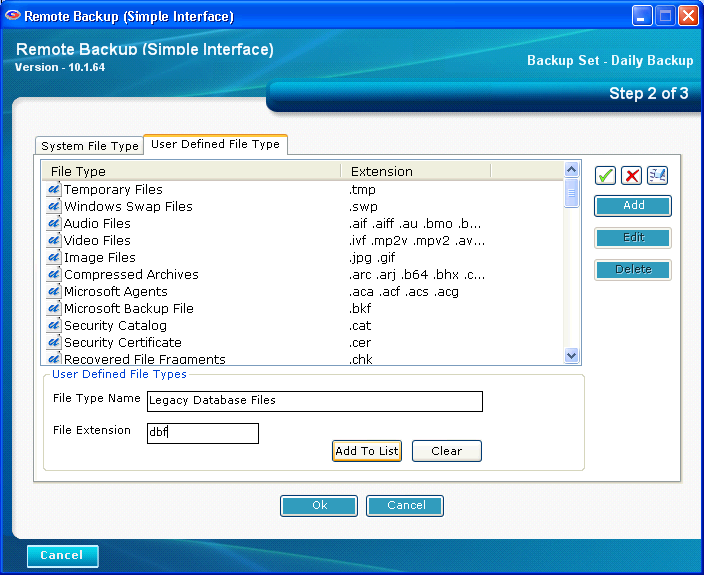
Type the name of your new file type, and its File Extension. Then click the Add To List button. You can then select your new file type from the list, and Include, Exclude, or Clear it. When you are finished, click the OK button.
To edit a User Defined File Type, highlight the file type in the list and click the Edit button.
To delete a User Defined File Type, highlight the file type in the list and click the Delete button.