The Copy to Disk function runs a backup using the currently selected Backup Set, but rather than sending it to the RBS Server, it sends it to a portable hard drive, CD, or DVD. This is useful when sending a large amount of data to the RBS Server as a first backup, which might take too long if sent over the Internet.
The archive files it places on a local drive are in the format required by the RBS Server. This function communicates with the RBS Server and sets up all the proper directories and resources to receive these files later, when they are copied onto the RBS Server from a portable hard drive, DVD, or CD.
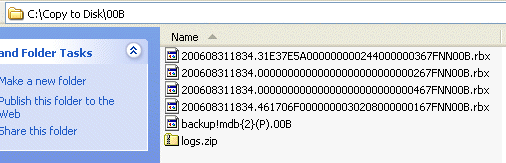
To copy files to a CD or DVD, they must first be copied onto a hard drive, usually in a folder of a drive in the computer running Remote Backup. Then use your regular CD or DVD burning software to copy the files from the hard drive to the CD or DVD.
To get them onto the RBS Server, send the portable hard drive, CD, or DVD to the Remote Backup Service Provider, who will copy them onto the RBS Server. The files will then be immediately available for online restore.
Select Copy to Disk button, and select the location where you want to send your backup files.
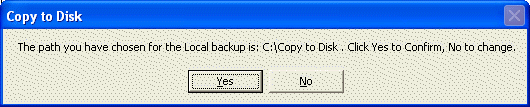
Confirm the location. The backup will begin, like a regular backup.
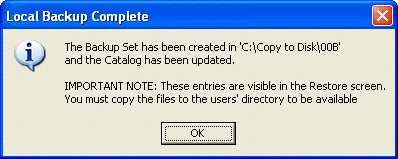
After the backup is complete, Remote Backup will tell you where it copied your files, and give further instructions.
It is important to immediately copy these files to removable media and send them to the RBS Server as soon as possible. Although they now show up in the Restore screen, they will not be available to restore until they are copied onto the RBS Server.